This is the multi-page printable view of this section.
Click here to print.
Return to the regular view of this page.
Spyglass
Spyglass
Spyglass is a pluggable artifact viewer framework for Prow. It collects artifacts
(usually files in a storage bucket) from various sources and distributes them to registered viewers, which
are responsible for consuming them and rendering a view.
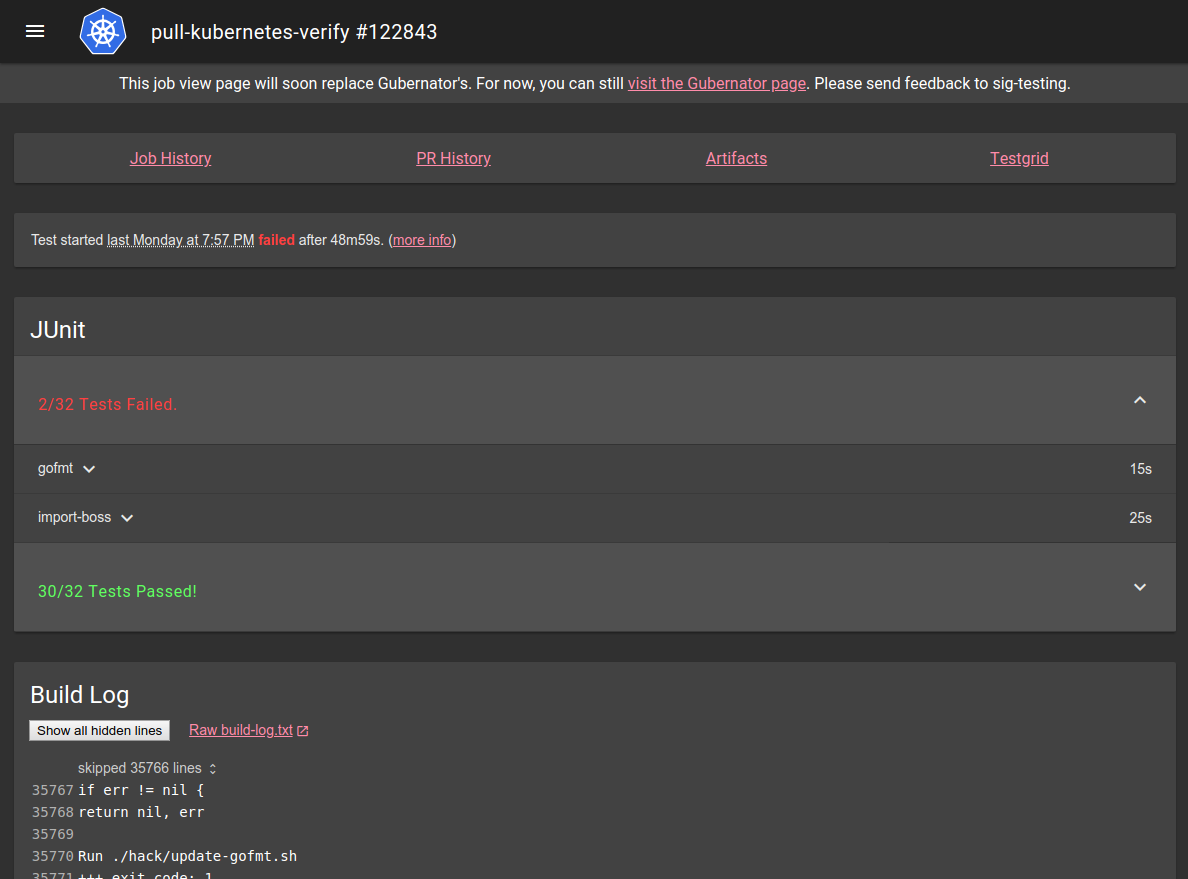
A typical Spyglass page might look something like this:
If you want to know how to write a Spyglass lens, check the lens-writing guide.
If you’re interested in how Spyglass works, check the architecture summary.
Configuration
Using Spyglass on your Prow instance requires you to first enable Spyglass in deck, and then
configure Spyglass to actually do something.
Enabling Spyglass
To enable spyglass, just pass the --spyglass flag to your deck instance. Once spyglass is enabled,
it will expose itself under /view/ on your deck instance.
In order to make Spyglass useful, you may want to set your job URLs to point at it. You can do so by
setting plank.job_url_prefix_config['*'] to https://your.deck/view/, and possibly plank.job_url_template
to reference something similar depending on your setup.
If you are not using the images we provide, you may also need to provide --spyglass-files-location,
pointing at the on-disk location of the lenses folder in this directory.
Configuring Spyglass
Spyglass configuration is contained in the spyglass subsection of the deck section of Prow’s
primary configuration.
The spyglass block has the following properties:
| Name |
Required |
Example |
Description |
size_limit |
Yes |
100000000 |
The maximum size of an artifact to download, in bytes. Larger values will be omitted or truncated. |
gcs_browser_prefix |
No |
https://gcsweb.k8s.io/gcs/
https://s3.console.aws.amazon.com/s3/buckets/ |
If you have a GCS browser available, the bucket and path to the artifact directory will be appended to gcs_browser_prefix and linked from Spyglass pages. If left unset, no artifacts link will be visible. The provided URL should have a trailing slash |
testgrid_config |
No |
gs://k8s-testgrid/config |
If you have a TestGrid instance available, testgrid_config should point to the TestGrid config proto on GCS. If omitted, no TestGrid link will be visible. |
testgrid_root |
No |
https://testgrid.k8s.io/ |
If you have a TestGrid instance available, testgrid_root should point to the root of the TestGrid web interface. If omitted, no TestGrid link will be visible. |
announcement |
No |
"Remember: friendship is magic!" |
If announcement is set, the string will appear at the top of the page. announcement is parsed as a Go template. The only value provided is .ArtifactPath, which is of the form gcs-bucket/path/to/job/root/. |
lenses |
Yes |
(see below) |
lenses configures the lenses you want, when they should be visible, what artifacts they should receive, and any lens specific configuration |
Configuring Lenses
Lenses are the Spyglass components that actually display information. The lenses block under the
spyglass block is a list of configuration for each lens. Each lens entry has the following
properties:
| Name |
Required |
Example |
Description |
required_files |
Yes |
- build-log\.txt |
A list of regexes matching artifact names that must be present for a lens to appear. The list entries are ANDed together - that is, something much match every entry. OR can be simulated by using a pipe in a single regex entry. |
optional_files |
No |
- something\.txt |
A list of regexes matching artifact names that will be provided to a lens if present, but are not necessary for it to appear (for that, use required_files). Since each entry in the list is optional, these are effectively ORed together. |
lens.name |
Yes |
buildlog |
The name of the lens you want to render these files. Must be a known lens name. |
lens.config |
No |
|
Lens-specific configuration. What can be included here, if anything, depends on the lens in question. |
The following lenses are available:
metadata: parses the metadata files generated by podutils
and displays their content. It has no configuration.junit: parses junit files and displays their content. Can optionally group tests based on XPath property selectors. Configuration supports a groups list, where each group has:
name: Display name for the groupselector: XPath-like property selector (e.g., properties/property[@name='lifecycle' and @value='informing'])collapsed: Boolean to control default expand/collapse state
buildlog: displays the build log (or any other log file), highlighting interesting parts and
hiding the rest behind expandable folders. You can configure what it considers “interesting” by
providing highlight_regexes, a list of regexes to highlight. If not specified, it uses defaults
optimised for highlighting Kubernetes test results. The optional hide_raw_log boolean field can be used to omit the link to the raw build-log.txt source.podinfo: displays info about ProwJob pods including the events and details about containers and volumes. The gcsk8sreporter Crier reporter must be enabled to upload the required podinfo.json file.coverage: displays go coverage contentrestcoverage: displays REST API statistics
Example Configuration
deck:
  spyglass:
    size_limit: 100000000  # 100 MB
    gcs_browser_prefix: https://gcsweb.k8s.io/gcs/
    testgrid_config: gs://k8s-testgrid/config
    testgrid_root: https://testgrid.k8s.io/
    announcement: "The old job viewer has been deprecated."
    lenses:
    - lens:
        name: metadata
      required_files:
      - ^(?:started|finished)\.json$
      optional_files:
      - ^(?:podinfo|prowjob)\.json$
    - lens:
        name: buildlog
        config:
          highlight_regexes:
          - timed out
          - 'ERROR:'
          - (FAIL|Failure \[)\b
          - panic\b
          - ^E\d{4} \d\d:\d\d:\d\d\.\d\d\d]
      required_files:
      - ^build-log\.txt$
    - lens:
        name: junit
        config: # optional
          groups:
          - name: "Informing Tests"
            selector: "properties/property[@name='lifecycle' and @value='informing']"
            collapsed: true
      required_files:
      - ^artifacts/junit.*\.xml$
    - lens:
        name: podinfo
        config:
          runner_configs: # Would only work if `prowjob.json` is configured below
            "<BUILD_CLUSTER_ALIAS>":
              pod_link_template: "https://<YOUR_CLOUD_PROVIDER_URL>/{{ .Name }}" # Name is directly from the Pod struct.
            # Example:
            # "default":
            #    pod_link_template: "https://console.cloud.google.com/kubernetes/pod/us-central1-f/prow/test-pods/{{ .Name }}/details?project=k8s-prow-builds"
      required_files:
        - ^podinfo\.json$
      optional_files:
        - ^prowjob\.json$ # Only if runner_configs is configured.
Accessing custom storage buckets
By default, spyglass has access to all storage buckets defined globally
(plank.default_decoration_config_entries[...].gcs_configuration) or on individual jobs (<path-to-job>.gcs_configuration.bucket).
In order to access additional/custom storage buckets, those buckets must be listed in deck.additional_storage_buckets.
1 - Spyglass Architecture
Spyglass is split into two major parts: the Spyglass core, and a set of independent lenses.
Lenses are designed to run statelessly and without any knowledge of the world outside being
provided with a list of artifacts. The core is responsible for selecting lenses and providing them
with artifacts.
Spyglass Core
The Spyglass Core is split across pkg/spyglass and cmd/deck. It has
the following responsibilities:
- Looking up artifacts for a given job and mapping those to lenses
- Generating a page that loads the required lenses
- Framing lenses with their boilerplate
- Facilitating communication between the lens frontends and backends
Spyglass Lenses
Spyglass Lenses currently all live in pkg/spyglass/lenses, though hopefully in the
future they can live elsewhere. Spyglass lenses have the following responsibilities:
- Fetching artifacts
- Rendering HTML for human consumption
Lens frontends are run in sandboxed iframes (currently sandbox="allow-scripts allow-top-navigation allow-popups allow-same-origin"), which ensures that they can only interact with the world via the
intended API. In particular, this prevents lenses from interacting with other Deck pseudo-APIs or with
the core spyglass page.
In order to provide this API to lenses, a library
(cmd/deck/static/spyglass/lens.ts) is injected into
the lenses under the spyglass namespace. This library communicates with the spyglass core via
window.postMessage. The
spyglass core then takes the requested action on the lens’s behalf, which includes facilitating
communication between the lens frontend and backend. The messages exchanged between the core and the
lens are described in cmd/deck/static/spyglass/common.ts.
The messages are exchanged over a simple JSON-encoded protocol where each message sent from the lens
has an ID number attached, and a response with the same ID number is expected to be received.
For the purposes of static typing, the lens library is ambiently declared in
pkg/spyglass/lenses/lens.d.ts, which just re-exports the definition of
spyglass from lens.ts.
This design is discussed in its implementation PR.
Lens endpoints
Lenses are exposed by the spyglass core on the following Deck endpoints:
| URL |
Method |
Purpose |
/spyglass/lens/:lens_name/iframe |
GET |
The iframe view loaded directly by the spyglass core |
/spyglass/lens/:lens_name/rerender |
POST |
Returns the lens body, used by calls to spyglass.updatePage and spyglass.requestPage |
/spyglass/lens/:lens_name/callback |
POST |
Allows the lens frontend to exchange arbitrary strings with the lens backend. Used by spyglass.request() |
In all cases, the endpoint expects a JSON blob via the query parameter req that contains
bookkeeping information required by the spyglass core - the artifacts required, what job this is
about, a reference to the lens configuration. This information is attached to requests by the
spyglass core, and the lenses are not directly aware of it. In the case of the POSTed endpoints
/rerender and /callback, the lens can choose to attach an arbitrary string for its own use. This
string is passed through the core as an opaque string.
Some additional query parameters are attached to the iframes created by the spyglass core. These are
not used by the backend, and are provided as a convenient means to synchronously provide information
from the frontend core to the frontend lens library.
Page loading sequence
When a spyglass page is loaded, the following occurs:
- The core backend generates a list of artifacts for the job (e.g. by listing from GCS)
- The core backend matches the artifact list against the configured lenses and determines which ones to
display.
- The core backend generates an HTML page with the lens->resource mapping embedded in it as JavaScript
objects.
- The core frontend reads the embedded mapping and generates iframes for each lens
- The core receives the simultaneous requests to the lens endpoints and invokes the lenses
to generate their content, injecting the lens library alongside some basic styling.
After this final step completes, the page is fully rendered. Lenses may choose to request additional
information from their frontend, in which case the following happens:
- The lens frontend makes a request to the core frontend
- The core frontend attaches some lens-specific metadata and makes an HTTP request to the
relevant lens endpoint
- The core backend receives the request and invokes the lens backend with the relevant
information attached.
2 - Build a Spyglass Lens
Spyglass lenses consist of two components: a frontend (which may be trivial) and a backend.
Lens backend
Today, a lens backend must be linked in to the deck binary. As such, lenses must live under
pkg/spyglass/lenses. Additionally lenses must be in a folder that matches the
name of the lens. The content of this folder will be served by deck, enabling you to reference
static content such as images, stylesheets, or scripts.
Inside your template you must implement the lenses.Lens interface.
An instance of the struct implementing the lenses.Lens interface must then be registered with
spyglass, by calling lenses.RegisterLens.
A minimal example of a lens called samplelens, located at lenses/samplelens, might look like this:
package samplelens
import (
	"encoding/json"

	"sigs.k8s.io/prow/pkg/config"
	"sigs.k8s.io/prow/pkg/spyglass/lenses"
)

type Lens struct{}

func init() {
	lenses.RegisterLens(Lens{})
}

// Config returns the lens's configuration.
func (lens Lens) Config() lenses.LensConfig {
	return lenses.LensConfig{
		Title:     "Human Readable Lens",
		Name:      "samplelens", // remember: this *must* match the location of the lens (and thus package name)
		Priority:  0,
	}
}

// Header returns the content of <head>
func (lens Lens) Header(artifacts []lenses.Artifact, resourceDir string, config json.RawMessage, spyglassConfig config.Spyglass) string {
	return ""
}

func (lens Lens) Callback(artifacts []lenses.Artifact, resourceDir string, data string, config json.RawMessage, spyglassConfig config.Spyglass) string {
	return ""
}

// Body returns the displayed HTML for the <body>
func (lens Lens) Body(artifacts []lenses.Artifact, resourceDir string, data string, config json.RawMessage, spyglassConfig config.Spyglass) string {
	return "Hi! I'm a lens!"
}
If you want to read resources included in your lens (such as templates), you can find them in the
provided resourceDir.
Finally, you will need to import your lens from deck in order to actually link it in. You can do
this by importing it from cmd/deck/main.go, alongside the other lenses:
import (
	// ...
	_ "sigs.k8s.io/prow/pkg/spyglass/lenses/samplelens"
)
Finally, you can then test it by running ./cmd/deck/runlocal and loading a spyglass page.
Lens frontend
The HTML generated by a lens can reference static assets that will be served by Deck on behalf of
your lens. Scripts and stylesheets can be referenced in the output of the Header() function (which
is inserted into the <head> element). Relative references into your directory will work: spyglass
adds a <base> tag that references the expected output directory.
Spyglass lenses have access to a spyglass global that provides a number of APIs to interact with
your lens backend and the rest of the world. Your lens is rendered in a sandboxed iframe, so you
generally cannot interact without using these APIs.
We recommend writing lenses using TypeScript, and provide TypeScript declarations for the spyglass
APIs.
In order to build frontend resources in, you will need to notify the build system. Assuming you had
a template called template.html, a typescript file called sample.ts, a stylesheet called
style.css, and an image called magic.png. The changes are:
- Add a new file called
tsconfig.json:
{
  "extends": "../../../../tsconfig.json",
  "include": [
    "sample.ts",
  ],
}
- Add a line in cmd/deck/.ts-packages:
prow/spyglass/lenses/sample/sample.ts->script_bundle.min.js
With this setup, you would reference your script in your HTML as script_bundle.min.js, like so:
<script type="text/javascript" src="script_bundle.min.js"></script>
Lens APIs
Many Spyglass APIs are asynchronous, and so return a
Promise. We
recommend using async/await to use them, like this:
async function doStuff(): Promise<void> {
  const someStuff = await spyglass.request("");
}
We provide the following methods under spyglass in all lenses:
spyglass.contentUpdated(): void
contentUpdated should be called whenever you make changes to the content of the page. It signals
to the Spyglass host page that it needs to recalculate how your lens is displayed. It is not
necessary to call it on initial page load.
spyglass.request(data: string): Promise<string>
request is used to call back to your lens’s backend. Whatever data you provide will be provided
unmodified to your lens backend’s Callback() method. request returns a Promise, which will
eventually be resolved with the string returned from Callback() (unless an error occurs, in which
case it will fail). We recommend, but do not require, that both strings be JSON-encoded.
spyglass.updatePage(data: string): Promise<void>
updatePage calls your lens backend’s Body() method again, passing in whatever data you
provide and shows a loading spinner. Once the call completes, the lens is re-displayed using the
newly-provided <body>. Note that this does not reload the lens, and so your script will keep
running. The returned promise resolves once the new content is ready.
spyglass.requestPage(data: string): Promise<string>
requestPage calls your lens backend’s Body() method again, passing in whatever data you
provide. Unlike updatePage, it does not show a spinner, and does not change the page. Instead,
the returned promise will resolve with the newly-generated HTML.
spyglass.makeFragmentLink(fragment: string): string
makeFragmentLink returns a link to the top-level page that will cause your lens to receive the
specified fragment in location.hash, and no other lens on the page to receive any fragment.
This is useful when generating links for the user to copy to your content, but should not be used
to perform direct navigation - instead, just update location.hash, and propagation will be
handled transparently.
If the provided fragment does not have a leading # one will be added, for consistency with the
behaviour of location.hash.
scrollTo scrolls the parent Spyglass page such that the provided (x, y) document-relative
coordinate of your lens is visible. Note that we keep lenses at slightly under 100% page width, so
only y is currently meaningful.
Special considerations
Sandboxing
Lenses are contained in sandboxed iframes in the parent page. The most notably restricted activity
is making XHR requests to Deck, which would be considered prohibited CORS requests. Lenses also
cannot directly interact with their parent window, outside of the provided APIs.
Links
We set a default <base> with href set pointing in to your resource directory, and target set
to _top. This means that links will by default replace the entire spyglass page, which is usually
the intended effect. It also means that src or href HTML attributes are based in those
directories, which is usually what you want in this context.
Fragments / Anchor links
Fragment URLs (the part after the #) are supported fairly transparently, despite being in an iframe.
The parent page muxes all the lens’s fragments and ensures that if the page is loaded, each lens
receives the fragment it expects. Changing your fragment will automatically update the parent page’s
fragment. If the fragment matches the ID or name of an element, the page will scroll such that that
element is visible.
Anchor links (<a href="#something">) would usually not work well in conjunction with the <base>
tag. To resolve this, we rewrite all links of this form to behave as expected both on page load and
on DOM modification. In most cases, this should be transparent. If you want users to copy links via
right click -> copy link, however, this will not work nicely. Instead, consider setting the href
attribute to something from spyglass.makeFragmentLink, but handling clicks by manually setting
location.hash to the desired fragment.
3 - JUnit lens
Parses and displays JUnit XML test results summarized by result, with optional filtering to group testcases by properties.
Configuration
The JUnit lens supports optional configuration to group testcases based on their XML properties:
groups - (optional) List of test groups to segregate tests based on properties. Each group entry has:
name - Display name for the group section headerselector - XPath property selector expression (currently supports properties/property[@name='X' and @value='Y'] syntax)collapsed - Boolean, whether the group section starts collapsed (default: false)
Tests matching a group selector are displayed in a separate group section with its name as header and the group’s pass/fail/skip/flaky breakdown. Tests that don’t match any group remain in a default group at the beginning.
Example Configuration
deck:
  spyglass:
    lenses:
    - lens:
        name: junit
        config:
          groups:
          - name: "Informing Tests"
            selector: "properties/property[@name='lifecycle' and @value='informing']"
            collapsed: true
          - name: "Upgrade Tests"
            selector: "properties/property[@name='type' and @value='upgrade']"
            collapsed: false
      required_files:
      - ^artifacts/junit.*\.xml$
JUnit XML files with optional <properties> elements within <testcase> elements:
<testsuites>
  <testsuite>
    <testcase classname="MyClass" name="test_something">
      <properties>
        <property name="lifecycle" value="informing"/>
      </properties>
    </testcase>
  </testsuite>
</testsuites>
Selector Syntax
Currently, only property predicates are supported. The selector syntax is:
properties/property[@name='<property-name>' and @value='<property-value>']
Both @name and @value are optional:
properties/property[@name='lifecycle'] - matches any property with name “lifecycle” regardless of valueproperties/property[@value='informing'] - matches any property with value “informing” regardless of nameproperties/property[@name='lifecycle' and @value='informing'] - matches properties with both name and value
Behavior
- Group selectors are processed in order; a test matches the first group whose selector matches, if any
- Tests that don’t match any group appear in the default group at the top
- Each group section shows its own summary (X/Y Failed, Passed, Skipped, Flaky)
- The
collapsed setting controls whether the group’s test details are initially hidden
4 - REST API coverage lens
Presents REST endpoints statistics
Configuration
threshold_warning set threshold for warning highlightthreshold_error set threshold for error highlight
uniqueHits total number of unique params calls (first hit of any leaf should increase this value)expectedUniqueHits total number of params (leaves)percent is uniqueHits * 100 / expectedUniqueHitsmethodCalled whether the method was calledbody body paramsquery query paramsroot root of the treehits number of all params hitsitems collection of nodes, if not present then the node is a leafheight height of the treesize size of the tree
{
    "uniqueHits": 2,
    "expectedUniqueHits": 4,
    "percent": 50.00,
    "endpoints": {
        "/pets": {
            "post": {
                "uniqueHits": 2,
                "expectedUniqueHits": 4,
                "percent": 50.00,
                "methodCalled": true,
                "params": {
                    "body": {
                        "uniqueHits": 2,
                        "expectedUniqueHits": 4,
                        "percent": 50.00,
                        "root": {
                            "hits": 15,
                            "items": {
                                "origin": {
                                   "hits": 8,
                                   "items": {
                                       "country": {
                                           "hits": 8,
                                           "items": {
                                               "name": {
                                                   "hits": 8
                                               },
                                               "region": {
                                                   "hits": 0
                                               }
                                           }
                                       }
                                   }
                                },
                                "color": {
                                    "hits": 0
                                },
                                "type": {
                                    "hits": 7
                                }
                            }
                        },
                        "height": 4,
                        "size": 7
                    }
                }
            }
        }
    }
}